Developing the Components for the Middle Tier in visual basic .Net
What is Middle Tier?
Middle tier equates to the Business tier or Application tier or Logical tier and contains the logic of the application. Middle tier simplifies the client´s access to the database (SQL Server) by isolating the business services from the Database and Presentation tiers. The components of the Application or Business tier are frequently called business services. Middle tier runs on a server and is often called the application server.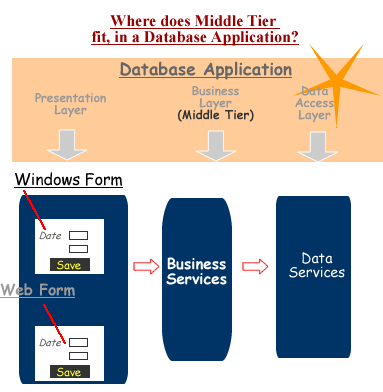
Middletier components are an important part of any large scale database application. Knowledge of developing a components based 3 tier application is critical for any databse developer.
The need for a Middle Tier
- Centralizing the business logic in an application tier has several advantages including maintainability, extensibility, and interoperability.
- Business rules often change, and we need to shield the rest of the system from the mutable logic. This decreases the effect on the rest of the application.
- Flexibility in reusing existing middle tier code can also assist organizations developing applications for various PC client operating system platforms.
- Coding application logic in middle tier decreases the overall development time.
Why we need to create a middle tier as a component
The component can be centralized on an application server and can be used the same way from the traditional Windows Form-based application as it would from a web application. You get a greater degree of reuse when you create a middle tier. If we centralize logic into a componenet, multiple client applications can use that logic without rewriting any of the code. The components isolate the front-end application from the SQL Server database.How to create a Component in visual basic.Net for accessing SQL Server Data
This article will explain the concept of creating a middle tier component to perform data access.I have used the NorthWind Database and Customers Table in this article.
Creating a Component is done by creating a Class Library in visual basic .Net.
Launch VS .NET and select File- New- Project from the menu. Select the Class Library project type from the Visual Basic Projects folder, within the New Project dialog box. Choose a file path for your project and name the class library CustomersManager. Click OK to create the project.
When we are creating class libraries, its important to name the class library as we create the new project. This way, we can take advantage of VS .NET´ s auto-generation feature, which automatically sets the root namespace and assembly name based on the name of the project. We can examine these attributes by right-clicking on the solution in the Solution Explorer and selecting Properties from the shortcut menu. You will see that the assembly name and root namespace are automatically chosen for you. This is shown in Fig.1.1.

Fig:- 1.1. Project Properties Window
By default, a single empty class, Class1, will be created for you. In visual basic .NET, you can store more than one class inside the .visual basic file.
In the code designer, rename the Class1 to Customers. If you look in your Solution Explorer, you will see that this does not automatically rename the file for you. For consistency, rename the Class1.vb file to Customers.vb via the Solution Explorer by right-clicking the file and selecting Rename. This changes the name of the file.
You will notice that an AssemblyInfo.vb file was automatically created for you. This is the manifest for the assembly. If you like, you can double-click the file to view the source code for the manifest.
Now, let ´s add a public function to the class (Customers). Double-click the Customers.vb file to launch the code designer window. First, import the namespaces that you will use in this class and write the following function GetCustomers().
Imports System.Data
Imports System.Data.SqlClient
Next, declare the public function, GetCustomers() as shown below:
Public Class Customers
Public Function GetCustomers(ByVal CompanyName As String) As DataSet
  Dim myConnection As SqlConnection = New SqlConnection
	 "Data Source=SYS1;Integrated Security=SSPI;Initial Catalog=NorthWind")
  Dim cmdselect As New SqlCommand()
  Dim daCustomers As New SqlDataAdapter()
  Dim dsCustomers As New DataSet()
  Try
   With cmdselect
   .CommandText = "SearchCustomers"
   .CommandType = CommandType.StoredProcedure
   .Connection = myConnection
   .Parameters.Add(New SqlParameter("@CompanyName",
		SqlDbType.VarChar, 40, ParameterDirection.Input, True,
		CType(10, Byte), CType(0, Byte), "",
		DataRowVersion.Current, Nothing))
    .Parameters("@CompanyName").Value = CompanyName
    End With
    With daCustomers
    .SelectCommand = cmdselect
    .Fill(dsCustomers, "Customers")
   End With
   GetCustomers = dsCustomers
    Catch excSQL As SqlException
    End Try
   End Function
End Class
How to use a component in visual basic .Net application
Step1:To test the component, right-click the solution file in the Solution Explorer and select Add - New Project. Select the Windows Application project type. Name this project as CustomerForm. After the project has been created, right-click on the project and chose the Set As StartUp Project option so that this will be the first project to load after you execute your solution.
We need to set a reference to the CustomersManager project so that the CustomersForm project can use it. Right-Click the CustomerForm project and select the Add reference option. This launches the Add Reference dialog box. Choose the Projects tab. You will see the CustomersManager project name listed at the top of the form. Click the Select button to reference the project, as shown in Fig:-1.2. This will add your project to the Selected Components list.
 Fig:-1.2. Add a Project Reference.
Now we will design the form.
From the Toolbox, add a new TextBox, DataGrid and Button control. The TextBox will be used to accept the search criteria- Company Name as shown in Fig:-1.3.

Fig:-1.3. Customers Form.
Next, add the code as shown below to the click event of the button.
Program Code :
Imports System.Data
Imports System.Data.SqlClient
Private Sub Form1_Load(ByVal sender As Object, ByVal e
	 As System.EventArgs) Handles MyBase.Load
End Sub
Private Sub Button1_Click(ByVal sender As System.Object,
	 ByVal e As System.EventArgs) Handles Button1.Click
  Dim objCusManager As New CustomersManager.Customers()
  Dim dsCustomers As DataSet
  dsCustomers = objCusManager.GetCustomers(TextBox1.Text)
  DataGrid1.DataSource = dsCustomers
End Sub
As you can see from the code, you first have to create a reference to your class library. We do this by using objCustomersManager variable and creating a new reference to the CustomersManager.GetCustomers class. Next, we need to create a DataGrid to store the results of the GetCustomers() method. You then use this DataSet to populate the DataGrid by using the DataSource property.
When you compile your code, the source code is generated into the Microsoft IL. As your code is executed, the CLR appropriately processes the IL and translates it to binary code at runtime. In the .NET Framework, the IL and metadata together compose the assembly, which is the unit of deployment.
If the application is production ready, you can choose to build by using the Release build option.
Select the CustomersManager project within your Solution Explorer. Choose the Release option from the drop-down menu. You can compile your project by right-clicking the CustomersManager project in the Solution Explorer and choosing Build.
Output:
When the button is pressed, DataGrid is displayed with customers as shown in Fig:-1.4.

Fig:-1.4. DataGrid with Customers data.
This article demonstrates how to use the middle tier to access SQL Server data. Middle tier can also be used to perform calculations. In this example of using a middle tier component we have seen how to separate UI, Logic, and Storage.